kubernetes calico网络

kubernetes calico网络

cni 网络

cni0 is a Linux network bridge device, all veth devices will connect to this bridge, so all Pods on the same node can communicate with each other, as explained in Kubernetes Network Model and the hotel analogy above.

cni(Container Network Interface)

CNI 全称为 Container Network Interface,是用来定义容器网络的一个 规范containernetworking/cni 是一个 CNCF 的 CNI 实现项目,包括基本额 bridge,macvlan等基本网络插件。

一般将cni各种网络插件的可执行文件二进制放到 /opt/cni/bin ,在 /etc/cni/net.d/ 下创建配置文件,剩下的就交给 K8s 或者 containerd 了,我们不关心也不了解其实现。

比如:

1
2
3
4
5
6
7
8
9
10
11
12
13
14
15
16
17
#ls -lh /opt/cni/bin/
总用量 90M
-rwxr-x--- 1 root root 4.0M 12月 23 09:39 bandwidth
-rwxr-x--- 1 root root 35M 12月 23 09:39 calico
-rwxr-x--- 1 root root 35M 12月 23 09:39 calico-ipam
-rwxr-x--- 1 root root 3.0M 12月 23 09:39 flannel
-rwxr-x--- 1 root root 3.5M 12月 23 09:39 host-local
-rwxr-x--- 1 root root 3.1M 12月 23 09:39 loopback
-rwxr-x--- 1 root root 3.8M 12月 23 09:39 portmap
-rwxr-x--- 1 root root 3.3M 12月 23 09:39 tuning
[root@hygon3 15:55 /root]
#ls -lh /etc/cni/net.d/
总用量 12K
-rw-r--r-- 1 root root 607 12月 23 09:39 10-calico.conflist
-rw-r----- 1 root root 292 12月 23 09:47 10-flannel.conflist
-rw------- 1 root root 2.6K 12月 23 09:39 calico-kubeconfig

CNI 插件都是直接通过 exec 的方式调用,而不是通过 socket 这样 C/S 方式,所有参数都是通过环境变量、标准输入输出来实现的。

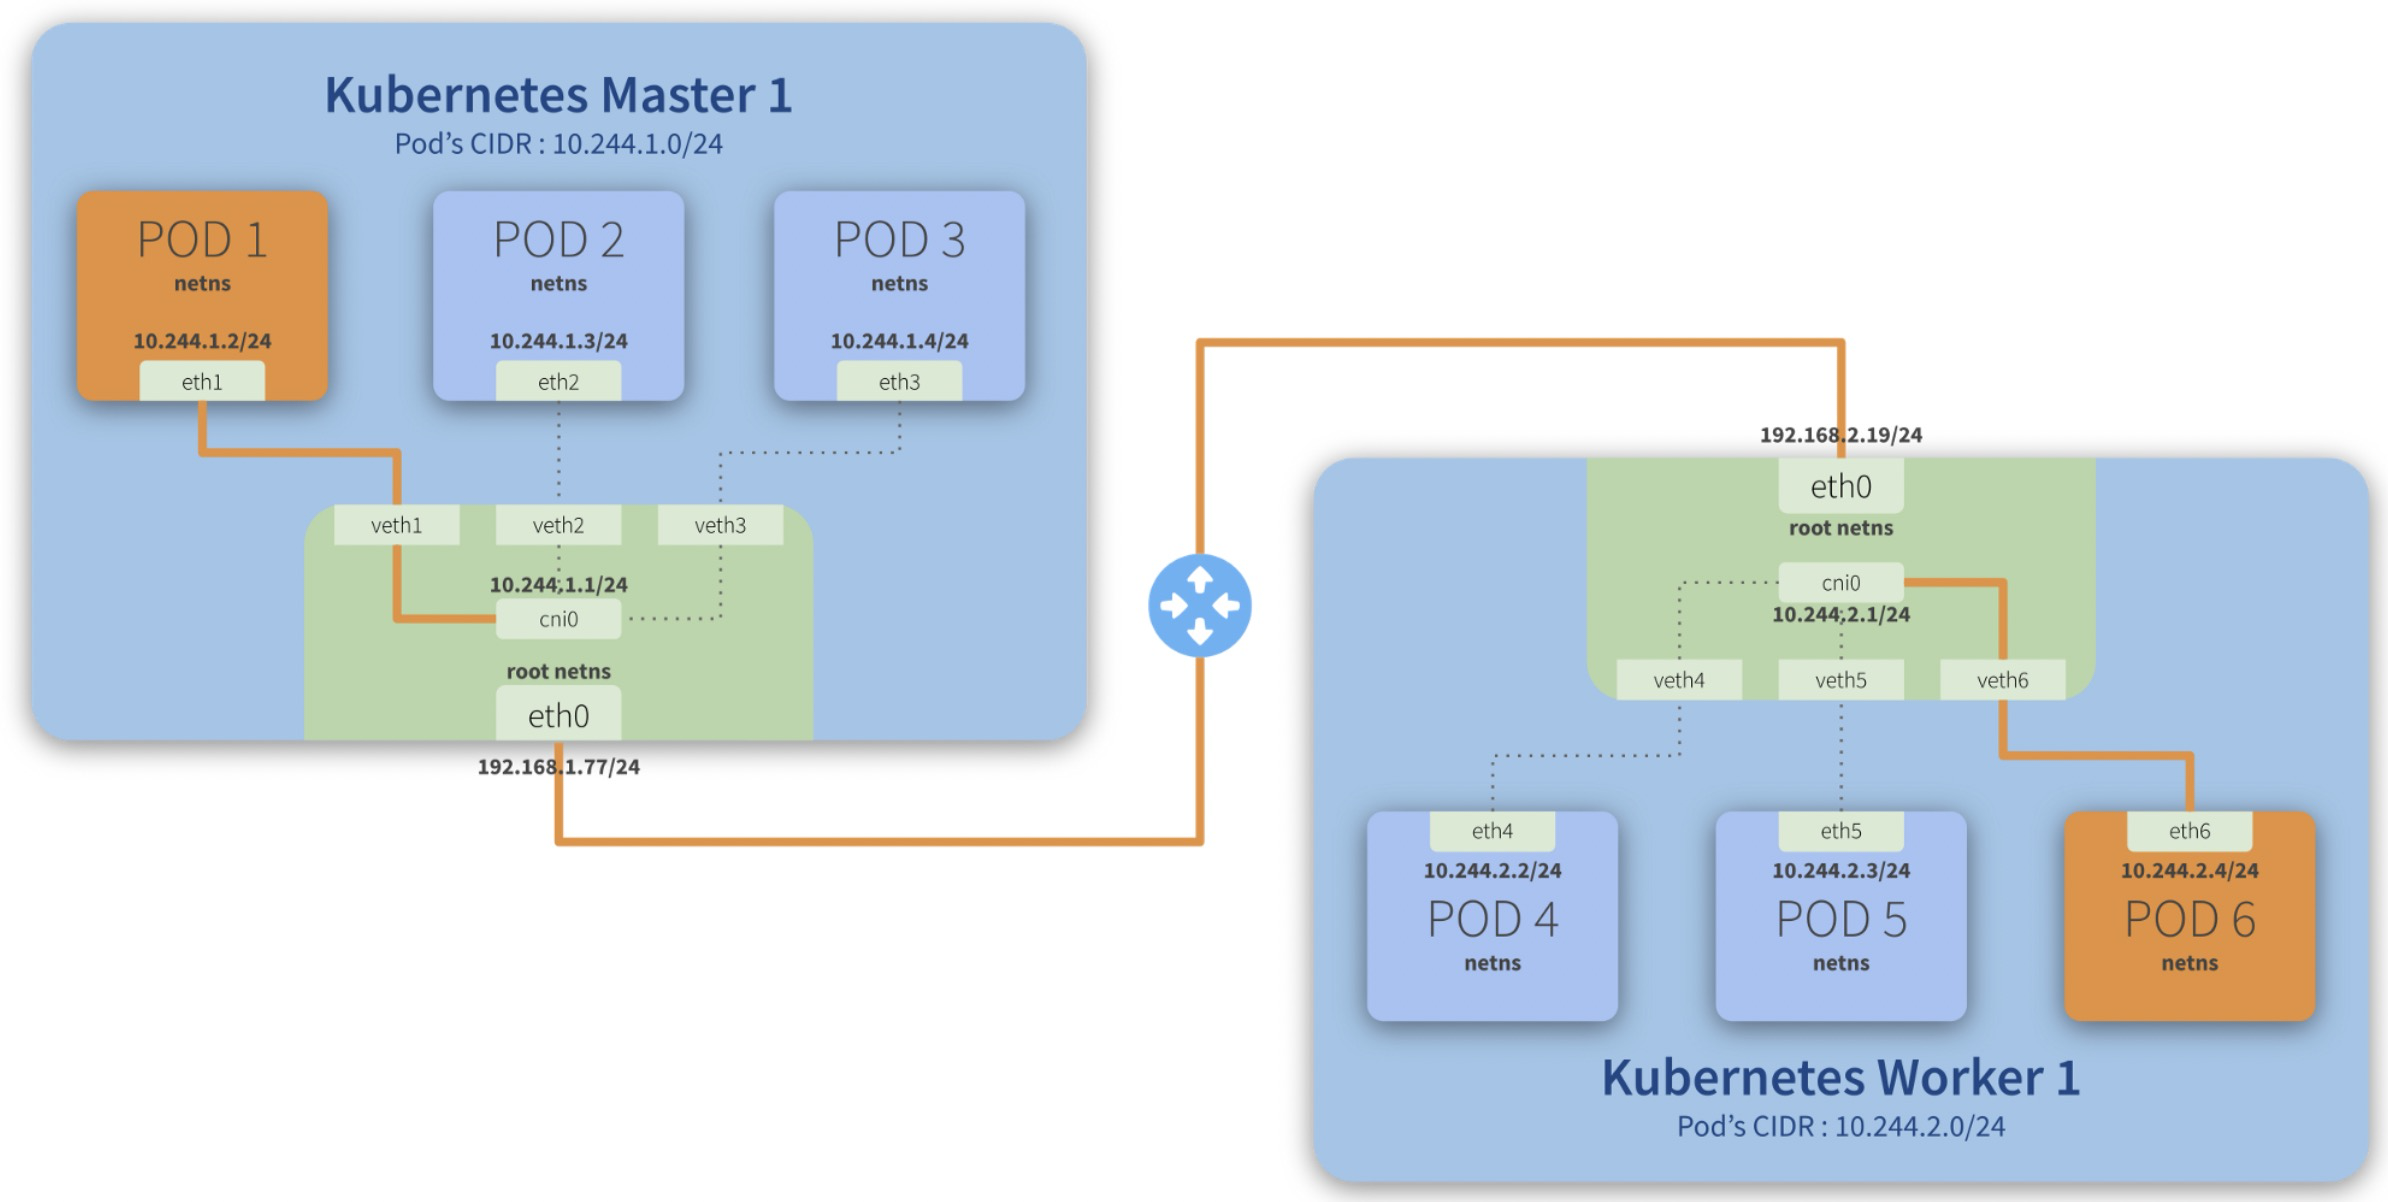
Step-by-step communication from Pod 1 to Pod 6:

  1. Package leaves Pod 1 netns\ through the eth1\ interface and reaches the root netns\ through the virtual interface veth1*;*
  2. Package leaves veth1\ and reaches cni0*, looking for **Pod 6***’s address;
  3. Package leaves cni0\ and is redirected to eth0*;*
  4. Package leaves eth0\ from Master 1\ and reaches the gateway*;*
  5. Package leaves the gateway\ and reaches the root netns\ through the eth0\ interface on Worker 1*;*
  6. Package leaves eth0\ and reaches cni0*, looking for **Pod 6***’s address;
  7. Package leaves cni0\ and is redirected to the veth6\ virtual interface;
  8. Package leaves the root netns\ through veth6\ and reaches the Pod 6 netns\ though the eth6\ interface;

image-20220115124747936

kubernetes calico 网络

1
2
3
4
kubectl apply -f https://docs.projectcalico.org/manifests/calico.yaml
#或者老版本的calico
curl https://docs.projectcalico.org/v3.15/manifests/calico.yaml -o calico.yaml

默认calico用的是ipip封包(这个性能跟原生网络差多少有待验证,本质也是overlay网络,比flannel那种要好很多吗?)

跨宿主机的两个容器之间的流量链路是:

cali-容器eth0->宿主机cali27dce37c0e8->tunl0->内核ipip模块封包->物理网卡(ipip封包后)—远程–> 物理网卡->内核ipip模块解包->tunl0->cali-容器

image.png

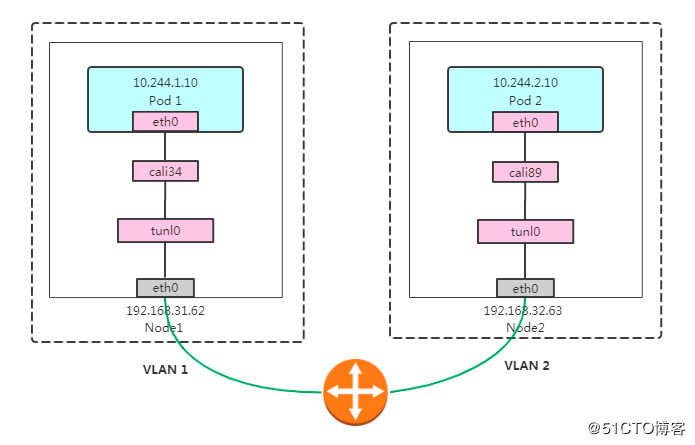
Calico IPIP模式对物理网络无侵入,符合云原生容器网络要求;使用IPIP封包,性能略低于Calico BGP模式;无法使用传统防火墙管理、也无法和存量网络直接打通。Pod在Node做SNAT访问外部,Pod流量不易被监控。

calico ipip网络不通

集群有五台机器192.168.0.110-114, 同时每个node都有另外一个ip:192.168.3.110-114,部分节点之间不通。每台机器部署好calico网络后,会分配一个 /26 CIRD 子网(64个ip)。

案例1

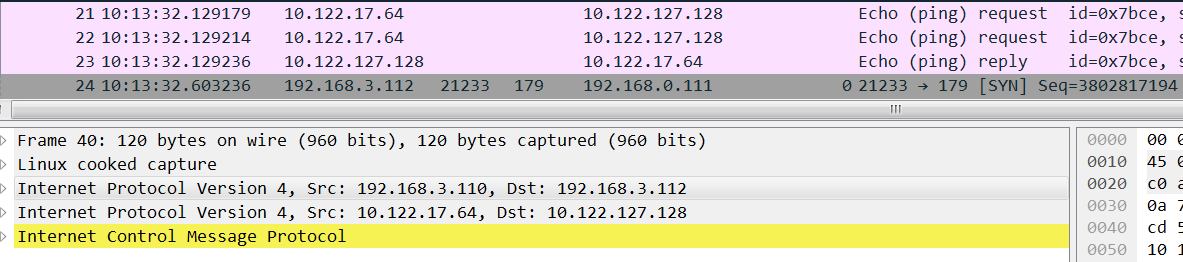
目标机是10.122.127.128(宿主机ip 192.168.3.112),如果从10.122.17.64(宿主机ip 192.168.3.110) ping 10.122.127.128不通,查看10.122.127.128路由表:

1
2
3
4
5
6
[root@az3-k8s-13 ~]# ip route |grep tunl0
10.122.17.64/26 via 10.122.127.128 dev tunl0 //这条路由不通
[root@az3-k8s-13 ~]# ip route del 10.122.17.64/26 via 10.122.127.128 dev tunl0 ; ip route add 10.122.17.64/26 via 192.168.3.110 dev tunl0 proto bird onlink
[root@az3-k8s-13 ~]# ip route |grep tunl0
10.122.17.64/26 via 192.168.3.110 dev tunl0 proto bird onlink //这样就通了

在10.122.127.128抓包如下,明显可以看到icmp request到了 tunl0网卡,tunl0网卡也回复了,但是回复包没有经过kernel ipip模块封装后发到eth1上:

image.png

正常机器应该是这样,上图不正常的时候缺少红框中的reply:

image.png

解决:

1
2
ip route del 10.122.17.64/26 via 10.122.127.128 dev tunl0 ;
ip route add 10.122.17.64/26 via 192.168.3.110 dev tunl0 proto bird onlink

删除错误路由增加新的路由就可以了,新增路由的意思是从tunl0发给10.122.17.64/26的包下一跳是 192.168.3.110。

via 192.168.3.110 表示下一跳的ip

onlink参数的作用:
使用这个参数将会告诉内核,不必检查网关是否可达。因为在linux内核中,网关与本地的网段不同是被认为不可达的,从而拒绝执行添加路由的操作。

因为tunl0网卡ip的 CIDR 是32,也就是不属于任何子网,那么这个网卡上的路由没有网关,配置路由的话必须是onlink, 内核存也没法根据子网来选择到这块网卡,所以还会加上 dev 指定网卡。

案例2

集群有五台机器192.168.0.110-114, 同时每个node都有另外一个ip:192.168.3.110-114,只有node2没有192.168.3.111这个ip,结果node2跟其他节点都不通:

1
2
3
4
5
6
7
8
9
10
11
12
#calicoctl node status
Calico process is running.
IPv4 BGP status
+---------------+-------------------+-------+------------+-------------+
| PEER ADDRESS | PEER TYPE | STATE | SINCE | INFO |
+---------------+-------------------+-------+------------+-------------+
| 192.168.0.111 | node-to-node mesh | up | 2020-08-29 | Established |
| 192.168.3.112 | node-to-node mesh | up | 2020-08-29 | Established |
| 192.168.3.113 | node-to-node mesh | up | 2020-08-29 | Established |
| 192.168.3.114 | node-to-node mesh | up | 2020-08-29 | Established |
+---------------+-------------------+-------+------------+-------------+

从node4 ping node2,然后在node2上抓包,可以看到 icmp request都发到了node2上,但是node2收到后没有发给tunl0:

image.png

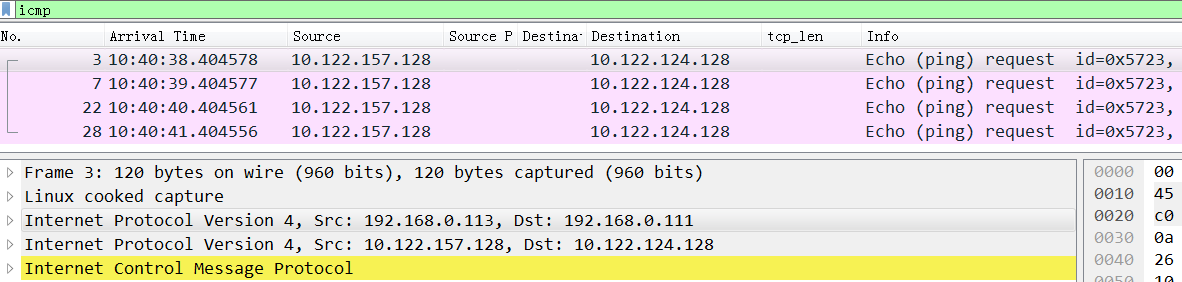
所以icmp没有回复,这里的问题在于kernel收到包后为什么不给tunl0

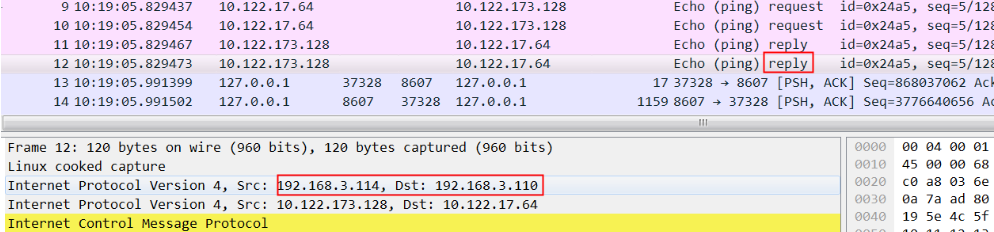
同样,在node2上ping node4,同时在node2上抓包,可以看到发给node4的request包和reply包:

image.png

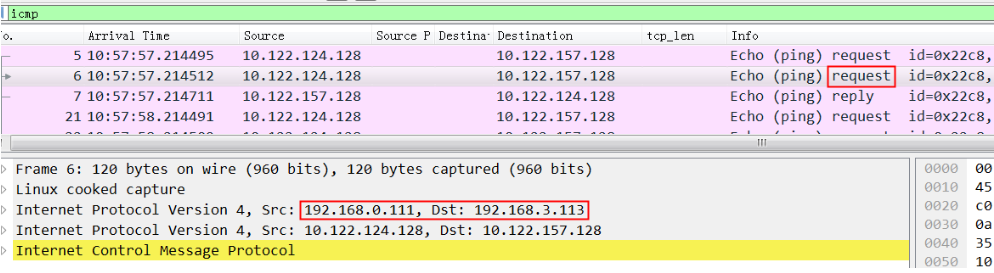
从request包可以看到src ip 是0.111, dest ip是 3.113,因为 node2 没有192.168.3.111这个ip

非常关键的我们看到node4的回复包 src ip 不是3.113,而是0.113(根据node4的路由就应该是0.113)

image.png

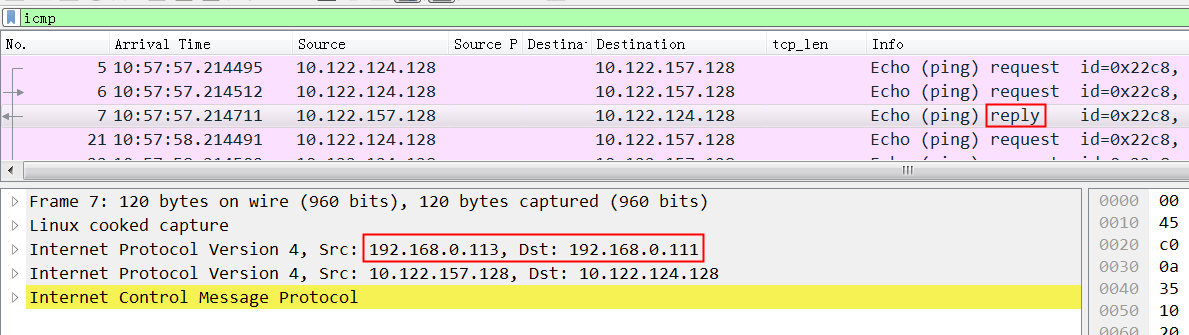
这就是问题所在,从node4过来的ipip包src ip都是0.113,实际这里ipip能认识的只是3.113.

如果这个时候在3.113机器上把0.113网卡down掉,那么3.113上的:

10.122.124.128/26 via 192.168.0.111 dev tunl0 proto bird onlink 路由被自动删除,3.113将不再回复request。这是因为calico记录的node2的ip是192.168.0.111,所以会自动增加

解决办法,在node4上删除这条路由记录,也就是强制让回复包走3.113网卡,这样收发的ip就能对应上了

1
2
3
4
ip route del 192.168.0.0/24 dev eth0 proto kernel scope link src 192.168.0.113
//同时将默认路由改到3.113
ip route del default via 192.168.0.253 dev eth0;
ip route add default via 192.168.3.253 dev eth1

最终OK后,node4上的ip route是这样的:

1
2
3
4
5
6
7
8
9
10
11
12
13
14
15
[root@az3-k8s-14 ~]# ip route
default via 192.168.3.253 dev eth1
10.122.17.64/26 via 192.168.3.110 dev tunl0 proto bird onlink
10.122.124.128/26 via 192.168.0.111 dev tunl0 proto bird onlink
10.122.127.128/26 via 192.168.3.112 dev tunl0 proto bird onlink
blackhole 10.122.157.128/26 proto bird
10.122.157.129 dev cali19f6ea143e3 scope link
10.122.157.130 dev cali09e016ead53 scope link
10.122.157.131 dev cali0ad3225816d scope link
10.122.157.132 dev cali55a5ff1a4aa scope link
10.122.157.133 dev cali01cf8687c65 scope link
10.122.157.134 dev cali65232d7ada6 scope link
10.122.173.128/26 via 192.168.3.114 dev tunl0 proto bird onlink
172.17.0.0/16 dev docker0 proto kernel scope link src 172.17.0.1
192.168.3.0/24 dev eth1 proto kernel scope link src 192.168.3.113

正常后的抓包, 注意这里drequest的est ip 和reply的 src ip终于一致了:

1
2
3
4
5
6
7
8
9
//request
00:16:3e:02:06:1e > ee:ff:ff:ff:ff:ff, ethertype IPv4 (0x0800), length 118: (tos 0x0, ttl 64, id 57971, offset 0, flags [DF], proto IPIP (4), length 104)
192.168.0.111 > 192.168.3.110: (tos 0x0, ttl 64, id 18953, offset 0, flags [DF], proto ICMP (1), length 84)
10.122.124.128 > 10.122.17.64: ICMP echo request, id 22001, seq 4, length 64
//reply
ee:ff:ff:ff:ff:ff > 00:16:3e:02:06:1e, ethertype IPv4 (0x0800), length 118: (tos 0x0, ttl 64, id 2565, offset 0, flags [none], proto IPIP (4), length 104)
192.168.3.110 > 192.168.0.111: (tos 0x0, ttl 64, id 26374, offset 0, flags [none], proto ICMP (1), length 84)
10.122.17.64 > 10.122.124.128: ICMP echo reply, id 22001, seq 4, length 64

总结下来这两个案例都还是对路由不够了解,特别是案例2,因为有了多个网卡后导致路由更复杂。calico ipip的基本原理就是利用内核进行ipip封包,然后修改路由来保证网络的畅通。

netns 操作

以下case创建一个名为 ren 的netns,然后在里面增加一对虚拟网卡veth1 veth1_p, veth1放置在ren里面,veth1_p 放在物理机上,给他们配置上ip并up就能通了。

1
2
3
4
5
6
7
8
9
10
11
12
13
14
15
16
17
18
19
20
21
22
23
24
25
26
27
28
29
30
31
32
33
34
35
36
37
38
39
40
41
42
43
44
45
46
47
48
49
50
51
52
53
1004 [2021-10-27 10:49:08] ip netns add ren
1005 [2021-10-27 10:49:12] ip netns show
1006 [2021-10-27 10:49:22] ip netns exec ren route //为空
1007 [2021-10-27 10:49:29] ip netns exec ren iptables -L
1008 [2021-10-27 10:49:55] ip link add veth1 type veth peer name veth1_p //此时宿主机上能看到这两块网卡
1009 [2021-10-27 10:50:07] ip link set veth1 netns ren //将veth1从宿主机默认网络空间挪到ren中,宿主机中看不到veth1了
1010 [2021-10-27 10:50:18] ip netns exec ren route
1011 [2021-10-27 10:50:25] ip netns exec ren iptables -L
1012 [2021-10-27 10:50:39] ifconfig
1013 [2021-10-27 10:50:51] ip link list
1014 [2021-10-27 10:51:29] ip netns exec ren ip link list
1017 [2021-10-27 10:53:27] ip netns exec ren ip addr add 172.19.0.100/24 dev veth1
1018 [2021-10-27 10:53:31] ip netns exec ren ip link list
1019 [2021-10-27 10:53:39] ip netns exec ren ifconfig
1020 [2021-10-27 10:53:42] ip netns exec ren ifconfig -a
1021 [2021-10-27 10:54:13] ip netns exec ren ip link set dev veth1 up
1022 [2021-10-27 10:54:16] ip netns exec ren ifconfig
1023 [2021-10-27 10:54:22] ping 172.19.0.100
1024 [2021-10-27 10:54:35] ifconfig -a
1025 [2021-10-27 10:55:03] ip netns exec ren ip addr add 172.19.0.101/24 dev veth1_p
1026 [2021-10-27 10:55:10] ip addr add 172.19.0.101/24 dev veth1_p
1027 [2021-10-27 10:55:16] ifconfig veth1_p
1028 [2021-10-27 10:55:30] ip link set dev veth1_p up
1029 [2021-10-27 10:55:32] ifconfig veth1_p
1030 [2021-10-27 10:55:38] ping 172.19.0.101
1031 [2021-10-27 10:55:43] ping 172.19.0.100
1032 [2021-10-27 10:55:53] ip link set dev veth1_p down
1033 [2021-10-27 10:55:54] ping 172.19.0.100
1034 [2021-10-27 10:55:58] ping 172.19.0.101
1035 [2021-10-27 10:56:08] ifconfig veth1_p
1036 [2021-10-27 10:56:32] ping 172.19.0.101
1037 [2021-10-27 10:57:04] ip netns exec ren route
1038 [2021-10-27 10:57:52] ip netns exec ren ping 172.19.0.101
1039 [2021-10-27 10:57:58] ip link set dev veth1_p up
1040 [2021-10-27 10:57:59] ip netns exec ren ping 172.19.0.101
1041 [2021-10-27 10:58:06] ip netns exec ren ping 172.19.0.100
1042 [2021-10-27 10:58:14] ip netns exec ren ifconfig
1043 [2021-10-27 10:58:19] ip netns exec ren route
1044 [2021-10-27 10:58:26] ip netns exec ren ping 172.19.0.100 -I veth1
1045 [2021-10-27 10:58:58] ifconfig veth1_p
1046 [2021-10-27 10:59:10] ping 172.19.0.100
1047 [2021-10-27 10:59:26] ip netns exec ren ping 172.19.0.101 -I veth1
把网卡加入到docker0的bridge下
1160 [2021-10-27 12:17:37] brctl show
1161 [2021-10-27 12:18:05] ip link set dev veth3_p master docker0
1162 [2021-10-27 12:18:09] ip link set dev veth1_p master docker0
1163 [2021-10-27 12:18:13] ip link set dev veth2 master docker0
1164 [2021-10-27 12:18:15] brctl show
brctl showmacs br0
brctl show cni0
brctl addif cni0 veth1 veth2 veth3 //往cni bridge添加多个容器peer 网卡

Linux 上存在一个默认的网络命名空间,Linux 中的 1 号进程初始使用该默认空间。Linux 上其它所有进程都是由 1 号进程派生出来的,在派生 clone 的时候如果没有额外特别指定,所有的进程都将共享这个默认网络空间。

所有的网络设备刚创建出来都是在宿主机默认网络空间下的。可以通过 ip link set 设备名 netns 网络空间名 将设备移动到另外一个空间里去,socket也是归属在某一个网络命名空间下的,由创建socket进程所在的netns来决定socket所在的netns

1
2
3
4
5
6
7
8
9
10
11
12
//file: net/socket.c
int sock_create(int family, int type, int protocol, struct socket **res)
{
return __sock_create(current->nsproxy->net_ns, family, type, protocol, res, 0);
}
//file: include/net/sock.h
static inline
void sock_net_set(struct sock *sk, struct net *net)
{
write_pnet(&sk->sk_net, net);
}

内核提供了三种操作命名空间的方式,分别是 clone、setns 和 unshare。ip netns add 使用的是 unshare,原理和 clone 是类似的。

Image

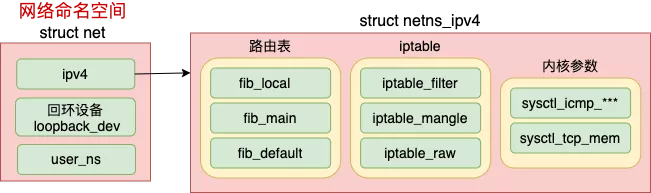
每个 net 下都包含了自己的路由表、iptable 以及内核参数配置等等

参考资料

https://morven.life/notes/networking-3-ipip/

https://www.cnblogs.com/bakari/p/10564347.html

https://www.cnblogs.com/goldsunshine/p/10701242.html

手工拉起flannel网络